Monday, August 20, 2012

Fellow Blogger Feature: Blue Collar Bad Girl

I just wanted to share this one with you all! Tamsen is another local blogger (who also happens to be my sweet baby brother's girlfriend), and while I love the clothes she designs for herself, I must admit that my favorite of her creative outlets is definitely her baking. This girl can bake like nobody's business! Seriously. And she makes valves; because being well rounded is very important. Without further ado, here are a couple of my favorite projects of hers....

This caped mini-dress is a newer project, and is absolutely adorable. She always looks cute, but this dress is definitely up there pretty high on the cute outfit list. I am no longer young enough to get away with a mini this micro, but she can still pull it off.


This pleated skirt is one of her own designs, as is the studded collar.


She ombre dyes her own jeans....


And I cannot begin to describe the goodness that is the vegan choco-nut peanut butter bliss bite. These things were seriously to die for. Chocolate, peanut butter, caramel and coconut. In miniature.


One of my favorite designs of hers, however, is this incredibly comfortable hooded tunic-dress. She very generously shared her pattern with me, and I could wear mine every day. It's one of those projects that I still haven't managed to take pictures of, but I think I'm going to make myself another one in the near future here, so I will make sure I take pictures of that one.


I really could go on and on about her baking, but suffice it to say, after several varieties of carrot cake, homemade chocolate truffles, Oreo cheesecake, pumpkin muffins with some incredible frosting (just enough to add sweetness without overpowering) and as many other goodies we could manage to get to the house before they were all eaten by my little brother, she has never made anything that was not "lick your fingers and pray there was more" good, and she frequently shares her recipes with us her dear readers. You, too, can have choco-nut peanut butter bliss bites in your life.

Photo credits go to my brother, Drury Graham.

I just started back to work teaching today, so it's back to the grind around here, but I should still be getting a few projects posted here and there as I get things finished up and photographed. Hope you all are having a wonderful start to the week!

-Evie

Saturday, August 18, 2012

Spotted Summer Ensemble

This post includes a few different projects, all of which started with the same piece of fabric as inspiration. Some of you may remember this dress that I made last summer.


The pattern was one of the Butterick re-issues, and the fabric was a birthday present from my mom a few years ago. It was a vintage cotton, almost lawn in weight, with flocked dots in red. When she gave it to me she said "I know there are at least four yards". Great! Just enough for a dress. When I went to cut this dress out, though, as I unfolded my yardage to wash it, it just kept unfolding further and further. You were right, Mom. There were at least four. In fact, there were FOUR-TEEN yards of this stuff. It was great because as vintage yard goods, it was only about 36 inches wide, but still. Fourteen yards is quite a hefty amount. I had so much left I decided to make another dress out of it, but using the reverse side of the fabric this time for a slightly different look this go around.

The pattern that I used was Vogue 1137.


I was immediately in love with this pattern. After measuring all of the pieces and comparing the body measurements and finished garment measurements I cut out a size 12 at bust and hip, and a size 10 at the waist. This is a pretty standard ratio for me on modern patterns, especially from the any of the Big Four companies. I also shortened the hem a few inches, another common adjustment I make in order to accommodate my 5'4'' and a more modern hem length. I made a few other adjustments as well, to suit my own taste. I eliminated the front darts in the skirt, pinning them out before I cut my fabric. I did this first of all, because I like a flatter fit in the front, but also to keep from interrupting the grid of red dots as much as possible. I also changed the neckline, raising it to a boat neck in front and a much deeper V in back. The entire dress is lined in white muslin, because this fabric is so thin. The pieces all fit together beautifully, even after my alterations, and the fit is perfect. While I liked the original style of the pattern to begin with, it makes a wonderful base for adaptation.


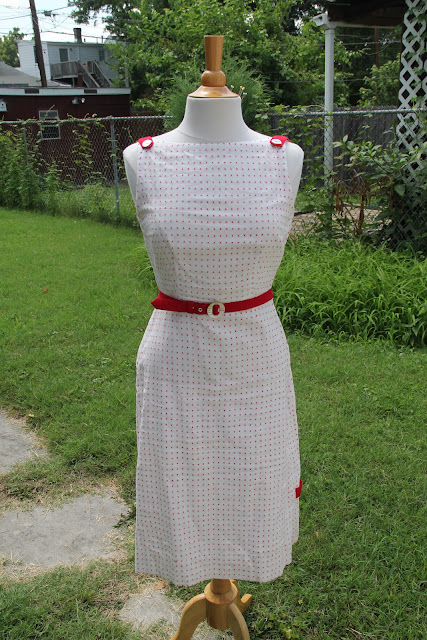
Once I had the dress nearly finished, I pondered what kind of embellishment I wanted to do. I knew I was going to make a coordinating belt from some stash red cotton, and my first idea was to run thin red piping around the neckline. My mom suggested instead making button tabs on the shoulders, which turned out to be the idea I went with, also adding some at the side vents in the skirt.


 I finished the belt with a vintage shell buckle I found on Etsy a long time ago, which matches the mother of pearl buttons on the tabs. The belt carriers are thread loops.


I'm pretty sure this is my new favorite dress. It's so summery and comfortable, but can still be very dressy if I need it to be. I love the way it fits as well. It's an extremely flattering dress, and I will be using the pattern in future without doubt. I would love to do a dress and coat ensemble like the envelope, but that will have to wait, as I don't have any coat fabric in my stash and am not permitting myself to buy any quantities of fabric until I've finished several more projects.

Continuing my stash busting efforts, even after making this dress I had enough fabric left to do something with, so I decided to make a playsuit. The pattern I used is an original that I found at a local antique store a couple of years ago. I haven't been able to pin down a specific year, but it appears to be from around 1940, give or take a couple of years.


And here is the playsuit....


Again, I apologize for all the wrinkles. I took these pictures in the middle of moving into the new house, and didn't have my ironing board yet, nor the time to iron everything anyway. The bow is a detachable pin, which I have also worn pinned at the center back of the V-neck on the previous dress, and their are thread loop belt carriers on the playsuit as well so I can also wear the belt with this if I don't want to wear the overskirt.


My bound buttonholes on the skirt didn't turn out perfectly straight, but there was no correcting it once I realized it. Oh, well. The bow distracts from that slightly so it's not too bad. I usually end up wearing the playsuit without the skirt anyway, so it doesn't bother me too much. The skirt is lined with the very last bits of the red and white cotton. The playsuit is also fully lined due to the sheerness of the fabric, and I ended up putting a much longer zipper in the side so that it opened all the way to the top in order to make it easier to get in and out of. It's very comfortable and is one of my new favorite summer garments. I'd like to make another one in a more practical color for running around when it's 95º out.

Monday, August 13, 2012

Homage to Griffe, and a query

The inspiration for this dress came from a Jacques Griffe design that I have adored for ages. Everything about this photo of actress Suzy Parker I find lovely. The fullness of the skirt, with all those tiny pleats (they almost look like cartridge pleats to me) paired with the simple, clean, satin jacket and dainty black shoes is to die for. The colors in the photo are, while not vibrant, rich and warm, and the expression on her face, and the movement in her pose are just lovely.


I found this fabric at a Ben Franklin's ages ago on their flat folds table, and I think I paid about $3 or $4 a yard for it. While I'm not 100% sure of the fabric content, since that is hardly one of Ben Franklin's top priorities, it definitely has a lot of rayon in it, if it's not all rayon. The weight and drape of it are wonderful though, and I knew from the get go that I wanted to make something with a big full skirt like this one. I bought all they had, which ended up being about 6 yards I think. It's been sitting in my stack for about two years and I finally got around to sewing it up. The colors reminded me of this photo and I decided to use Butterick 4512 again, making the bodice from a solid black to mimic the black jacket in Giffe's design. 


Ever since I used this pattern for my white a and blue polka dot dress last summer I've wanted to use it again, because I like the way the top fits, and the overall shape was so nice. I only used the bodice for this version though, adding my own, extra-voluminous skirt. Other than the skirt alteration, the only thing I had to change about the pattern was the same neck adjustment I made the first time around. The sides of the halter neck were much too loose on me, and so I tightened them up a few inches total to bring the neck up higher and to eliminate the gaping around the top of the bust in front. The fabric for the bodice I found on a clearance table at JoAnn's (although the clearance price wasn't all that cheap). I only needed a yard, so it wasn't bad though, especially since the skirt fabric was so much cheaper. There is a little bit of pulling that happens at the darts on Tabitha since we are not exactly the same proportions, but it lays more smoothly on me.


The skirt is a 1.75 circle skirt. I didn't have enough to get two full circles out of it, but one and three-quarters circles is still a pretty voluminous skirt, especially with a crinoline under it. I love the black one underneath the skirt in the Giffe original, but I don't have one and have tulle to make an ivory one next, so the black will have to wait. While the shape I get with my current crinoline is great, I don't really care for it. It is too heavy and tends to not lay evenly all around, so I'm going to make myself a new one.

I decided to monogram the collar, since I don't have anything monogrammed and have been toying with the idea on several other garments for a while. I opted for a very subtle black on black "E" on the left collar point. While not perfect, it came out pretty well for an only slightly planned first attempt.


My original plan was to pleat the skirt in tiny knife pleats, but I ended up not being able to get the necessary width at the top to do that many little pleats and still have the length and fullness that I wanted at the hem, so I ended up just gathering it onto the bodice and am overall satisfied with the result. Getting the hem even on such a massive skirt was a complete bear, and there are still a couple of places that need to be adjusted; that is, if I ever get to a point where I care enough to make the minor adjustments to a skirt that moves around so much no one will likely notice the imperfections anyway.

After looking back at my finished project, I think that one of the things that I enjoyed most about this dress is that it reminds me of a project that I did in high school. During a visiting artist session with Lee Mingwei at Oxbow we did a project that reflected on the subject/issue of copying in the art world. Mingwei addressed the issue we have in the Western world with the idea of copying another art work; something that is generally perceived as low, uncreative, unoriginal, or even stealing. Through his work with us he wanted to emphasize the importance of copying others (especially older artists) in the education of artists for centuries, not only in the Western hemisphere, but particularly in Asian artistic traditions. In both areas of the world, copying the old masters was how a student learned to handle their medium and their subject, studying the work and technique of their predecessors directly and actively. This process seems to have lost value in the the modern Western tradition in particular. He provided us with a list of 21 modern artists, and we were each asked to choose one artist and one piece to copy. The term copy here, he used rather loosely, telling us we could copy directly, copy form, copy palette, copy subject, whatever it was about the piece we found interesting or compelling. I chose Pat Steir, an artist whose work was as far from my comfort zone as I could get. The painting that I chose is entitled Green One.

Image Source
I can't currently find the disk that has my portfolio photos on it, and I don't have a copy of them anywhere else, but I'll try and find a picture of my version soon. I would just take another photograph, but it's about 3.5'x6' and it's off the stretcher bars, so it would be a little tough to do. Anyway, the point of the project was to use the copying process to help further our skills and develop our own artistic visions through a slightly more focused path. I think this same concept applies to a lot of the things that I and many of you other sewers create, but in my opinion at least, there is a different attitude toward the concept of "copying" in the sewing world than there is in the art world. Whether this has something to do with the (in today's world) more mainstream and visible nature of fashion and fashion design as compared with the very closed art world, or because of the wearable, functional aspects of clothing as an art form. I do think the comparison is an interesting one, though. What are your opinions on the subject of copying (I again am using the term rather loosely)? Do you see it as a helpful, productive step in one's development as an artist/creator or as something that should be avoided in pursuit of the truly innovative and unique? Are the two things mutually exclusive?

Thursday, August 9, 2012

Greetings from Holland, Michigan!

        While this isn't a sewing related post, it is another project that I managed to finish in the last couple of months. As a reenactor, I am well aware of the wonders of wooden shoes, especially when you're tromping through a wet, muddy campsite. I have a pair of plain wooden sabot that I wear to events, sabot being the French versions that are more appropriate for the group we portray. However, some friends of ours passed this pair of Dutch clogs along to me a couple of years ago. They didn't fit anyone in their family and the more narrow cut of these shoes was perfect for my skinny little heels. Despite the fact that Dutch shoes (the much pointier toes indicate that they are Dutch and not French, which have a more rounded toe) are not appropriate for me at events, I really loved the shape of them and decided to just keep them they way they were. However, these shoes happen to be souvenirs from someone's trip to Holland, Michigan in 1974. There is a note on the bottom that says "From Holland Mich. From Mom and Dad July 16, '74". Their daughter had apparently decided that they needed some decoration and had started painting flowers and words like "Peace" and "Love" all over them. Most of her plans, however, didn't make it past the pencil stage on the shoes so they were only partially painted with some very seventies teenage cheese happening. So, I sanded the outside of the shoes down a bit to get the paint and the pencil marks off and then set myself to painting.

        I looked around at lots of painted dutch clogs before I settled on colors and designs, and finally decided that I really liked the look of the yellow ones. Digging around through my mom's acrylics I pulled out the perfect shade of bright yellow, and several other colors to do the decorative designs on the toes. I wanted to make sure that I used a traditional design, and found this amongst several Pennsylvania Dutch designs. I loved the combination of bird, floral and hearts, and the shape and size was just right for the tops of my shoes. I printed it off and transferred them on to the shoes using a very primitive pencil/rubbing method and then started deciding on colors for the various components. I finally threw a couple of coats of satin finish polyurethane on them last week so now all I need is something to pad the top edge so they don't rub on my feet. Come next spring these are going to become my garden shoes. It's going to take some work to get the yards in shape for planting, so I don't even want to attempt it yet, on top of trying to get the house in order, but as I said before, wooden shoes are great for dirty, wet lawns. The poly should really help make them easy to wipe off as well. I just need to make myself a pair of 1940s overalls to wear with them and my gardening ensemble will be complete. The neighbors are going to think I'm a complete nut.


(I've been playing around with Mr. S's fancy Canon the last couple of days. He works all the time, and has given me permission to use it whenever I want. Definitely more fun than my old point and click. Tee hee!)

Tuesday, August 7, 2012

Bathing Beauty

In a never ending effort to work through my stack of fabric and projects, I whipped up this little number several weeks ago, allowing me to cross one more thing off my list.


The top for this sunsuit is the 1950s Beach Bra Halter Top from Mrs. Depew Vintage. Here again, I didn't bother to make a muslin first, but the fit is pretty good for the first time through. It's definitely wearable. There are a couple of minor adjustments I would make if I were to make this again, which is a definite possibility since it's a really cute top. First, I would shorten the halter strap just a hair. I think I would probably take about half an inch out just to give it a bit snugger fit and a tad more support up front. I would also want to adjust the darts some to accommodate a slightly larger cup size. I thought about putting sew-in bra cups in this one, but without having done a muslin first to adjust the fit properly it wasn't going to happen neatly so I just skipped them. I used two large red buttons on the back closure, which are very cute, but I think it would also benefit in future from a little bit of narrow elastic around the bottom just to snug things up a little bit more. That would just be my personal preference, in order to make myself completely comfortable with not wearing a bra under it.

My original plan was just to make the top to go with my sailor shorts that I made last summer. My mom picked the fabric up for me though, and when she discovered how much on sale it was she bought me an extra yard, which then became the trunks for the full sunsuit.

The pattern I used for the trunks is the same pattern I have used for all of my shorts. McCalls 7665 from 1949. I hadn't used the trunks part of this pattern before, but as they were very similar to the shorts, I figured it would be pretty easy to whip them up. I adjusted the waistline a tad so they would sit up as high as I wanted them to, and took them in a bit in the sides as I have done repeatedly with the shorts pattern in order to get a closer fit. I also shortened them so they would be more bathing-suit length. They have a side zip and elastic in the legs. The waist did not turn out perfectly, as I faced it instead of using the waistband, but it is serviceable. I really just made this an an experiment and for photo purposes more than actual wear. The top was always intended to get more use.


Now that I've got this project under my belt, and have seen a few other people's attempts at vintage bathing suits, I am interested in maybe putting together a useable 1940s bikini at some point. I have to work through the piles of fabric I already have though before I can let myself start planning more projects.

Monday, August 6, 2012

Nocturne in Silk

First of all, I would like to apologize for such an extended absence from the blog. I've had so much going on this year, it's really taken a back seat. That is not the case, however with my sewing and I have several projects that I'm finally getting around to taking pictures of that I'd like to share with you all.

One of my favorite (and most recent) projects from the past few months is this 1943 nightgown in black silk, trimmed with silk ribbon bows.


I bought this fabric some time ago with plans to make a pair of 1920s/30s combinations, but the company I ordered it from accidentally sent me twice the yardage that I ordered (at no extra charge) so I had to reassess my plans for it. At some point in the last couple of years I came across an original copy of McCall's 5441. The yardage required was just under what I had of this printed silk, so I decided to make myself a snazzy nightgown for lounging around the house while I grade papers and do laundry, because even those mundane activities deserve a little bit of fabulous, right?

Couldn't help sneaking a my darling Bruce into the picture as well. 
It was a very quick pattern to put together. I had the whole thing finished in a day, more or less. It did take me much longer to decide which color ribbon to use to trim the shoulders, but I got it figured out the next day with a little input from my main squeeze. He turned out to be a pretty good color chooser.


Please excuse all the wrinkles. Having just moved everything has been in and out of boxes and bags and I haven't had a chance to iron anything as I'm still trying to just get things organized. I decided it was more important to get pictures taken than to make sure everything was wrinkle and crease free. The nightgown is ankle length, with a rolled hem at the bottom and the armholes. The neckline is faced front and back and hand stitched. I will admit, I didn't get the shoulder straps lined up perfectly with the inverted pleats on the bodice fronts, so the bows were partly to camouflage my minor mistakes, but everything is better with bows anyway. It took me forever to decide what color ribbons to use, but my sweet Mr. S. decided the lavender and copper were the best of the bunch and asked why I couldn't use both. Good question. Both it is then. I think he did well.

Other than the gentle shaping in the pattern pieces themselves, the inverted pleats at top and bottom in the bodice fronts and the self-fabric waist ties are the only real shaping to the nightgown, which keep it looking just tailored enough while still being very comfortable. The silk itself is a dream where comfort is concerned as well. It's so soft and feels light as air since it's such thin fabric.

As far as the pattern itself goes, as I said it was a very easy pattern to put together, and while you may or may not be able to get hold of an original copy, Evadress has it available as a reprint in multiple sizes. I haven't used the jacket pattern yet, but I'm sure it's not too much more complicated than the gown. Being silk, it took a lot of pinning, but the pieces fit beautifully and the construction was very straightforward. The waist seam is top-stitched, I hemmed the armholes and bottom with my rolled hemmer on my Featherweight, and did all other finishing by hand. As the copy I have is a size 12 (just a tad too small for me) I added a little at the side seams, but this was done very easily without requiring any alterations to the pattern pieces themselves. I think this pattern would work up really well in a very light cotton as well, for something a little more practical perhaps.

The nightgown didn't use up all of my fabric, however, so I had to find something else to make and decided to try out the Pauline bra pattern I'd had sitting around for months. I was, as usual, impatient and didn't make a muslin, but it turned out pretty well for a first run through.


I ended up with a little bit of wrinkling in the left side of the bias band, but other than that I didn't really have any issues. The top edges are faced with a bias strip and hand stitched, and I made a matching bow from the silk ribbon I used on the nightgown to trim the center front. I used the findings I had cut from an old bra to finish the closure and straps. I really could have taken a tad out of the center back to accommodate the bra hooks, but it still fits pretty well, while perhaps not quite as snugly as I would like. This may also simply be a function of the fact that I generally wear much more structured bras. It's really comfortable all in all though, and great for hanging around the house when I don't want all the extra elastic and wires. I generally wear a 32C and this fit pretty well straight from the pattern, which says it is for a 34 inch bust.

I still have some of this silk left, even after the nightgown and bra, so I'm going to make myself a pair of silk knickers (with bows also of course) to use up the last of the scraps. Hopefully I'll have those together in the next couple of weeks so I can get them on here as well.
Related Posts Plugin for WordPress, Blogger...